Featured
Tags
Share
- Home / Blog / Campus News / Try This at Home! DIY Nursing Skills Simulators
Try This at Home! DIY Nursing Skills Simulators

When the going gets tough, the tough get creative. Chamberlain students have come up with a number of inventive ways to practice their fundamental nursing skills at home—all using everyday items.
“Students who learn best by doing can really benefit from these kinds of practice simulators,” said Columbus campus professor Taryn Hill. “They can build confidence in the skill, and hopefully, decrease some of their anxiety surrounding the return demonstration,” during which students need to perform a skill correctly in front of their instructor.
Student creations have included practice simulators for wound care and tracheostomy. Read on for their recipes for success.
Wound Care
Columbus students Jennie Gates, Charmaine Kaylor, and Cindy Riffle created 55 pseudo abdominal wounds and gave them to the following class of fundamentals students—all of whom went on to ace their wound care return demonstration the first time around. (Well done!) Here’s how they did it:
Make Your Own Pseudo Abdominal Wounds
1 cup flour 1/2 cup salt 1 cup water Mini paint roller pan
- Mix all ingredients thoroughly.
- In the mini paint roller pan, spray the well designated for the paint with PAM vegetable spray. Stuff a portion of dough into this part of the pan for a perfect rectangle that is about 1 ½–2 inches thick.
- Pop the dough out of the form.
- Make an incision about 4-5 inches long and scoop it out. Add tunneling. As the “artist,” you get to play with the depth and severity of the wound. Remember that the wounds may puff a little in the oven, which will alter the finished product.
- Bake at 350 degrees for about 20 minutes. Depending on the thickness of the wound, you are looking for the wound to be baked like a cookie - and firm. Use discretion for the cooking time.
- Let it dry completely before painting.
- Use craft paint in skin tones and red to make your wound look authentic. (Do not paint the bottom side, as moisture retention may cause the wound to get moldy or the paint to peel.)
- Allow to completely dry before applying spray lacquer or a clear waterproof coat to finish.
Makes two nice-sized wounds. Happy packing!
Tracheostomy Care

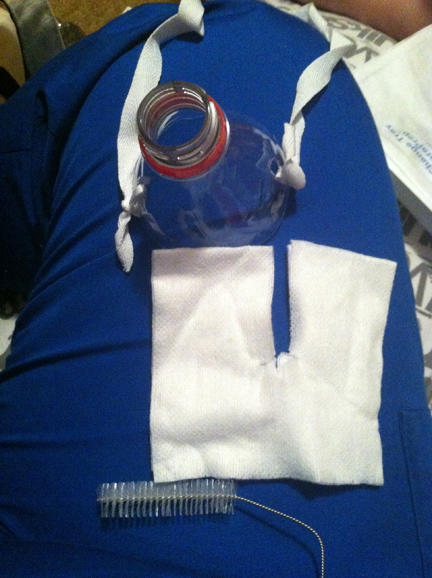
When she was in fundamentals, Columbus student Devon Jolley developed an ingenious way of practicing the care and suctioning of a tracheostomy (surgically created breathing hole in the neck)—and the only things she needed were a soda bottle and her tracheostomy kit.
Create Your Own Pseudo Tracheostomy
- Cut the top rounded portion of a 20-oz bottle off of the rest of the bottle.
- Cut one hole in each side of the top part.
- From the tracheostomy kit, take the tracheostomy tie and tie it onto the bottle top.
- Use the pipe cleaners and/or inner cannula cleaning brush as a mock inner cannula to practice insertion and removal with proper technique.
- Put mock tracheostomy on stuffed animal, friend or anything you would like and practice with all supplies.
Got your own ideas to help your fellow students? We’d love to hear them. Share your tips in the comments below.
By Danielle Logacho
More from Campus News
Request More Information
To receive the Chamberlain University Program Guide, including associated career paths, please select a program of study.


